Key takeaways
- Hanging by wire without measuring its lift. A wire rises 1 to 2 inches under load. Measure to the pulled-taut point, not the slack wire, or every frame hangs low by a different amount.
- Skipping templates. One extra hole per frame becomes ten patched holes on a ten-frame wall.
- Inconsistent gaps. Any spacing between 1.5 and 3 inches looks intentional as long as every gap is the same. Mixed spacing looks accidental.
- Centering frames on the wall instead of on furniture. Art above a sofa should center on the sofa, even if that is off-center on the wall.
- Hanging too high. The center of the whole arrangement belongs at 57 to 60 inches from the floor, or the bottom row 6 to 10 inches above furniture.
- Single hooks on frames wider than 16 inches. They pivot with every vibration from a door closing.
- Nailing into a drywall seam or near an outlet. Seams crumble; outlets mean wires run vertically within 6 inches.
- Adhesive strips for a whole gallery. They work for frames under 4 pounds on smooth walls but fail unpredictably, and one falling frame can take down neighbors.
A gallery wall that is off by an inch looks like a mistake from across the room. The frame on the left tilts 2 degrees, the gaps run 2 inches on one side and 3.5 on the other, and the whole arrangement drifts upward toward the ceiling because each nail went in a little higher than the last. Fixing it afterward means pulling nails, patching holes, and repainting, which is the outcome people fear and why so many gallery walls never get past the pile-of-frames-on-the-floor stage. The failures come from three habits: eyeballing instead of measuring, hanging from a wire without accounting for how far the wire rises under load, and skipping the paper template step. With a template, a level, and about 90 minutes for a wall of 8 to 12 pieces, you can get every frame level and every gap identical on the first try.
What You Need
| Item | Why | Optional? |
|---|---|---|
| Kraft paper or newspaper, enough to trace every frame | Templates let you arrange and adjust on the wall without a single hole | No |
| Painter’s tape | Holds templates to the wall and marks alignment lines; leaves no residue | No |
| Tape measure and pencil | Layout, spacing, and hanger-point transfer | No |
| 24-inch or longer level, or a laser level | A laser line across the whole wall is the fastest way to align a row; a 24-inch bubble level works for individual frames | No |
| Picture hooks rated for each frame’s weight | Standard nail-in hooks hold 10 to 50 lb; tap-in drywall hanger kits (80 tacks for 40 frames, about $18) handle frames up to 20 lb without a hammer | No |
| Hammer | For traditional hooks | Optional if using tap-in hangers |
| Sawtooth hangers or D-rings | Two-point hardware keeps frames from tilting; add to any frame that came with only wire or nothing | Optional depending on frames |
| Small adhesive rubber bumpers | Stick to bottom corners of each frame to stop drifting and protect paint | Optional but recommended |
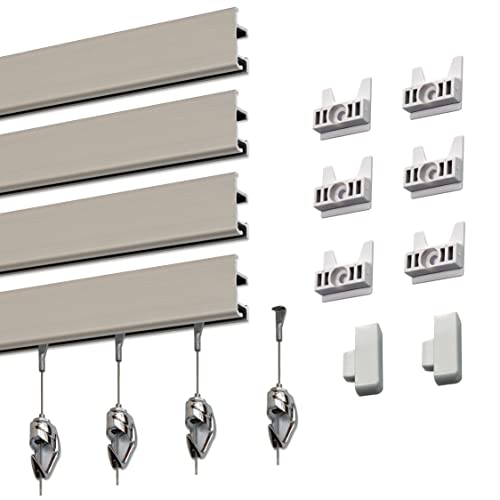
| Picture rail or track system | A wall track with adjustable hanging cords lets you slide and reposition frames endlessly; kits covering about 30 feet run $350 to $400 | Optional, for frequent rearranging |
| Stud finder | Avoids wires and finds studs for heavy frames over 30 lb | Optional |
Step-by-Step
Step 1: Add two-point hardware to every frame (15 to 20 minutes for 10 frames)
Flip each frame over. A single sawtooth in the center lets the frame pivot; a wire sags and lets it tilt. Install two sawtooth hangers 2 to 3 inches in from each side edge at the same height, or two D-rings about one-third of the way down from the top. Use a small square or measure from the top edge so both hangers are identical to within 1/16 inch. Frames under 5 pounds can keep a single sawtooth if it is centered, but they will need bumpers to stay square.
Our top picks

As an Amazon Associate we earn from qualifying purchases at no extra cost to you.
Step 2: Trace templates and mark hanger points (15 minutes)
Lay each frame face down on kraft paper and trace its outline. Cut out the template. Measure from the top edge of the frame down to the hanger (for sawtooth, the notch; for wire, pull the wire taut toward the top and measure to that point), and mark that spot on the template with an X. Mark two Xs for two-point hardware, spaced exactly as they are on the frame. Label each template with which frame it represents.
Step 3: Plan the layout on the floor (15 minutes)
Measure the wall area you want to fill. For a wall above a sofa, the total arrangement should span 60 to 75 percent of the sofa width. Lay the templates on the floor inside a taped rectangle of those dimensions. Pick a spacing between frames and stick to it; 2 to 3 inches (5 to 8 cm) is standard and 1.5 inches works for small frames under 8 x 10. Choose an anchor: either a horizontal center line at 57 to 60 inches from the floor that runs through the middle of the arrangement, or a straight bottom or top edge that every frame aligns to. Take a photo of the final floor layout.
Step 4: Tape templates to the wall (15 minutes)
Snap a level reference line on the wall with painter’s tape at your anchor height; a laser level makes this a 1-minute job. Transfer the templates one at a time from the floor to the wall, starting with the largest or most central piece, using the tape measure to reproduce the same gaps. Check each with the level. Step back 10 feet and look. Adjust freely; this is the whole point of paper. Live with it for a day if you can.
Step 5: Install hooks through the templates (15 minutes)
With the templates still on the wall, drive each hook or tap-in hanger directly through the X marks. For a hook with a nail, hold the hook against the paper and drive the nail so the bottom of the hook lands exactly on the X. For two-point frames, put the level across both Xs before driving the second hook. Then tear the paper away; the hooks remain in the right spots.
Step 6: Hang and level each frame (10 minutes)
Set each frame on its hooks. Two-point frames should sit level immediately if the hooks were placed carefully. Set the level on the top edge and adjust small errors by sliding one side of a sawtooth a notch, or by bending a wire hanger slightly. Press a rubber bumper onto each bottom corner so the frame sits flat and cannot creep.
Step 7: Check spacing and alignment (5 minutes)
Run the tape between every pair of adjacent frames and confirm each gap matches your target within 1/8 inch. Check that shared edges line up with a level laid across them. Stand back at the room’s main viewing spot, usually the doorway, and look for anything that reads as off. Fix it now; it will not bother you less tomorrow.
Step 8: Photograph the result (1 minute)
Take a straight-on photo and one from the side. If a frame is bumped later, you have a reference for resetting it.
Mistakes to Avoid
- Hanging by wire without measuring its lift. A wire rises 1 to 2 inches under load. Measure to the pulled-taut point, not the slack wire, or every frame hangs low by a different amount.
- Skipping templates. One extra hole per frame becomes ten patched holes on a ten-frame wall.
- Inconsistent gaps. Any spacing between 1.5 and 3 inches looks intentional as long as every gap is the same. Mixed spacing looks accidental.
- Centering frames on the wall instead of on furniture. Art above a sofa should center on the sofa, even if that is off-center on the wall.
- Hanging too high. The center of the whole arrangement belongs at 57 to 60 inches from the floor, or the bottom row 6 to 10 inches above furniture.
- Single hooks on frames wider than 16 inches. They pivot with every vibration from a door closing.
- Nailing into a drywall seam or near an outlet. Seams crumble; outlets mean wires run vertically within 6 inches.
- Adhesive strips for a whole gallery. They work for frames under 4 pounds on smooth walls but fail unpredictably, and one falling frame can take down neighbors.
How Often
Check a gallery wall for level every 3 to 6 months, or any time a door nearby slams. Frames on single hooks drift most; frames with two-point hardware and bumpers rarely move. Dust the top edges monthly, since accumulated dust on one side can shift balance on light frames. Rehang anything you take down for cleaning using the same hooks and check with the level. If you rotate art often, a picture rail system pays for itself after the third rearrangement by eliminating new holes entirely; the cords slide along the track and adjust for height in seconds.
When to Call a Pro or Replace
Bring in an art installer when any single piece exceeds 40 pounds or 36 inches in width, when the wall is plaster and lath or brick, when the gallery runs up a staircase and requires working from a ladder over stairs, or when the arrangement includes more than 20 pieces and you want a precise grid. Installers charge roughly $75 to $150 per hour and can typically hang a 12-piece gallery in 2 hours. Replace the hanging hardware, not the frame, when a sawtooth has bent or pulled out of the frame back; a new pair costs a dollar. Replace a frame when the corners have separated, the backing board is warped enough that the frame will not sit flat, or the glass is cracked. Reframe a print you like rather than discarding it; standard 8 x 10 through 16 x 20 frames run $10 to $40.
FAQ
How much space should be between frames on a gallery wall?
Two to three inches (5 to 8 cm) between every adjacent edge is the standard. Use 1.5 inches for small frames under 8 x 10 inches and up to 4 inches for oversize frames over 24 x 36. Whatever you choose, keep every gap identical to within 1/8 inch.
How high should the center of a gallery wall be?
Fifty-seven to sixty inches (145 to 152 cm) from the floor to the center of the arrangement in rooms where people stand or walk through. Above a sofa or headboard, let the bottom row sit 6 to 10 inches above the furniture and let the center fall where it will.
How do I keep frames from tilting after hanging?
Install two hangers per frame at the same height, use two hooks in the wall placed with a level, and press a small rubber bumper onto each bottom corner. Frames over 16 inches wide on a single hook will always drift.
Is a laser level worth buying for a gallery wall?
For a single row or a grid, yes. A basic self-leveling cross-line laser costs $25 to $60 and projects a perfectly level line across the whole wall, which turns a 30-minute alignment job into 5 minutes. For an organic, staggered layout, a 24-inch bubble level and paper templates are enough. Many laser models sold in 2026 include a magnetic mount that clips onto a metal door frame or a picture hook, so no tripod is needed.