Key takeaways
- Place a thin drawer liner beneath trays to reduce sliding and rattling when drawers open.
- Store heavier items near the bottom to improve stability and reduce strain on drawer slides.
- Use removable labels so the layout can evolve without leaving permanent marks.
- Do a five-minute reset after each project: wipe tools, return them to their assigned spaces, and discard packaging.
What's inside
A well-organized tool chest does more than keep screws from disappearing. It brings the same calm, considered feel to a garage, workshop, or utility room that a thoughtfully arranged dresser brings to a bedroom. When every hammer, bit, and socket has a visible home, projects become quicker—and the storage itself looks intentional rather than improvised.
This guide explains how to organize a tool chest for easy access, how to choose trays and specialty holders, and when a modular rolling system makes more sense than a traditional chest. The aim is a setup that works hard, suits the way you actually use tools, and still feels visually tidy.
As an Amazon Associate we earn from qualifying purchases.



1. Empty the Chest and Sort by Function
Start with a complete reset. Remove everything from the drawers and group tools by task rather than by size alone: measuring, driving, cutting, fastening, plumbing, electrical work, and automotive tools are useful categories. Keep frequently used items together, even if they are different shapes. A tape measure, utility knife, pencil, and small level may form a more practical “everyday repair” group than a drawer devoted strictly to one tool type.
As you sort, separate duplicates, damaged tools, and items that belong elsewhere. A tool chest should not become a general-purpose dumping zone for batteries, gardening supplies, or random hardware. Cleaning the drawers before replacing anything also helps prevent grit from working into tool mechanisms.
2. Measure Before Buying Organizers
Tray systems are only helpful when they fit the drawers properly. Measure each drawer’s interior width, depth, and usable height, paying attention to slides, lips, and recessed corners. Shallow trays are ideal for small hardware and hand tools; deeper drawers can accommodate pliers, ratchets, or bulky accessories.
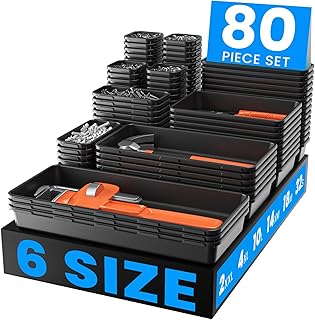
Interlocking bins are especially useful because they can be rearranged as your collection changes. The A-LuGei 69-piece, five-size organizer is a strong choice for a larger chest or a mixed workshop, with multiple bin dimensions for creating a fitted layout. For a more extensive assortment, the A-LUGEI six-size, 80-piece organizer is designed to hold more varied tools and small parts. Its many compartments can help prevent the common problem of one oversized bin swallowing an entire category.
3. Create a Visual Hierarchy
Think of each drawer like a small interior composition. Place the tools you reach for most often at the front or in the top drawers, while heavier and less frequently used equipment belongs lower down. Keep handles facing the same direction where possible; the repeated shapes make the drawer easier to scan and give it a polished, orderly appearance.
Use contrasting trays to make metal tools easier to spot. Black organizers have a clean, workshop-friendly appearance, but lighter-colored labels or small adhesive tags can improve visibility. The A-LuGei 46-piece, five-size tray set works well for a compact chest, bathroom repair drawer, or secondary storage area where only a modest selection of hardware is needed.
Leave a little breathing room. Filling every square inch may look efficient at first, but it makes removal awkward and leaves no space for the next useful tool. Around 10 to 15 percent spare capacity is a sensible target.
4. Give Sockets and Small Parts Their Own System
Sockets are among the easiest tools to misplace because their sizes look similar and their loose forms roll into corners. A dedicated holder keeps standard and metric sets separated and makes missing pieces immediately obvious. Arrange sizes in ascending order, and label the rails if the markings are difficult to read in low light.
The EACELIY magnetic socket organizer set includes six holders for 1/2-inch, 1/4-inch, and 3/8-inch SAE and metric sockets, with capacity for up to 141 standard sockets. Its magnetic attachment is intended for steel tool chests and carts, so confirm that your storage surface is compatible before buying. Remember that sockets are not included.
For screws, washers, anchors, and cable ties, use small removable bins rather than loose piles. The A-LuGei six-size tray set, which is designed to fit more than 100 tools, is useful when small parts need to share space with hand tools without becoming visually chaotic. Extra-thick plastic is a worthwhile feature for bins that will be moved often.
5. Choose the Right Chest Format
A drawer chest suits a stationary workshop and offers excellent visibility, but it is not always the most flexible option. If tools travel between the garage, driveway, and garden, consider a modular rolling system with a secure handle and durable wheels. A rolling base also reduces the temptation to carry heavy tools in an unsafe, overloaded box.
The Keter Stack N Rolling Tool Box Modular Storage System is a three-piece option with all-terrain wheels, a telescoping handle, and weather-resistant construction. Its modular format can separate bulky equipment from smaller hand tools, although it may be more storage than a small apartment workshop requires. Check the dimensions, weight capacity, and intended weather exposure before leaving any system outdoors for extended periods.
Tips
- Place a thin drawer liner beneath trays to reduce sliding and rattling when drawers open.
- Store heavier items near the bottom to improve stability and reduce strain on drawer slides.
- Use removable labels so the layout can evolve without leaving permanent marks.
- Do a five-minute reset after each project: wipe tools, return them to their assigned spaces, and discard packaging.
Frequently Asked Questions
Should tools be stored in drawers or on a pegboard?
Use drawers for valuable, small, or frequently transported tools, and a pegboard for lightweight items you want to see immediately. A combination often works best: drawers protect precision tools while a wall-mounted surface displays commonly used hammers, clamps, or levels.
How do I organize a tool chest with limited space?
Prioritize tools you use regularly and choose adjustable bins rather than fixed inserts. Combine related functions where practical, such as a basic repair drawer containing measuring, marking, and driving tools. Keep seasonal or specialist equipment in a separate labeled container.
Are magnetic socket holders safe for a rolling tool cart?
They can be, provided the holder is designed for a steel surface and the sockets are seated firmly. Test the drawer with a gentle open-and-close motion before moving the cart quickly. For transport over uneven ground, a latching case or additional retention may be preferable.
How often should a tool chest be reorganized?
Review the layout every few months or after completing a major project. If you repeatedly leave a tool on top of the chest, that is useful feedback: either move it to a more accessible drawer or create a dedicated everyday-use section.
Conclusion
The best tool chest organization is a balance of visibility, protection, and personal rhythm. Sort by how you work, measure before buying trays, reserve special holders for sockets and small parts, and leave enough room for future additions. With a few well-chosen organizers—and a layout treated with the same care as any other room in your home—your tool storage can be both highly practical and genuinely pleasing to use.